From looking at the initial brief and then at my final animation, I am confident that I have produced a high quality piece of work and that I have learned a great deal about Character Animation from doing so.
I was a bit of a learning curve for me at first because I had never really modelled people before. I made sure that I did this first as a practice so that my final models would look realistic and in proportion. The man that I made at the beginning of the semester was made from a box. I found that this method of modelling suited me well and I continued to use it for most other models. I really enjoy modelling heads now. I find that getting the character of the person in to the face to very challenging but also very enjoyable. I am particularly pleased with 'Brenda's' face. The expressions that I achieved using the 'Morpher' look realistic and effective. I deliberately exaggerated the expressions for a more comical effect. This can be noted when 'Brenda' becomes very angry with the Rocker towards the end of the sequence.
Animating using boning and skinning was also very new to me. I have experimented with it before but could never get to grips with it. In this module I had to work hard at it to get it right. I found the boning relatively simple. The use of the IK Limb solver did make animating the arms of the characters much easier. I did however have a number of problems with the envelopes. I found this to be quite tedious and time consuming. It was more of a problem with Brenda because she has a fat body. Her upper arms are quite close to her upper body and this meant that the bone in her arm was affecting the arm and also her body. Eventually I got round the problem and Brenda's body movement is probably the most realistic in the whole animation.
I have picked up a number of useful skills when it comes to rendering and putting sequences together. I found out how to properly compress the renders to achieve a higher quality and I furthered my experience with Adobe Premier to produce a sequence which flows correctly.
I do feel that I have put a great deal of character in the models that I have produced for this module. I also think that good research into the characters has helped me to properly convey their traites and personalities. One concern is that I was unable to model hair for the Rocker. I originally wanted to have the Rocker as an older man with long grey hair. I was going to use the 'Hair and Fur' tools in 3D Studio Max but this was proving to be a huge problem when it came to rendering, as it was taking far to long. Instead I decided to go for the punk style hair. This certainly negated the rendering problem, but it does make the Rocker look considerably younger than was initially intended.
If I had more time, or If I was to do this animation again, I would make a few changes. Now that I have more experience with modelling I would make more realistic hands for the characters. People show a lot of emotion through their hands and this emotion would be great to inject in to the characters. I also need to learn more about lighting. I have used really quite simple lighting effects in the animation and this is something that can make animations look highly realistic if done properly. Although I do think that having music alone in the animation is quite effective, I would like to try adding dialogue. This would also give me an opportunity to experiment with lip syncing techniques.
Thursday, 8 May 2008
Putting the clips together
I animated my sequence in small chunks. This meant that the render times were small (no more than 3 hours) and I could easily adjust the flow of the sequence in editing software afterwards. I used Adobe Premier. This is a very 'easy to use' program and I recommend it to everyone. I imported all of my finished renders and while consulting my story board I put each scene roughly in place on the timeline. Thankfully I stuck to my story board, this made this stage much easier.
Then I set about shortening the clips to make then flow correctly. I also used cross fades between a couple of the scenes, as they a very effective for conveying passing time. This took a few attempts to get right. When I added the music I did have to fiddle about with the scenes again. i sort of used cues in the music to determine when the scene changes should happen.
Because some scenes show the burger van far away (like at the start, when the Rocker is walking past in the distance) I adjusted the volume of the music to make it louder the closer the camera is to its source. (the radio in the burger van) This gives the sequence much more depth, It sounds like the music is part of it rather than just being played over the top.
With premier I did have a few problems when exporting. I found that the quality of the finished sequence wasn't as good as that of final renders. Does anyone know how to adjust the compression settings in Premier? I'm not sure if it is the compression that is the problem, but I think it may have something to do with it.
Finished render 3
Here is a finished render of the rocker. As you can see he is getting a little carried away with the music from the radio.
The song that I have chosen to use to accompany the animation is 'Sweet Child 0' Mine' by 'Guns 'n' Roses. This is because it is from the same era as the rocker and also because it has an awesome guitar solo for him to air guitar to!
Again I tryed to get as much movement in to the scene as possible. The shoulders of the rocker move back as the head tilts foward and vice versa, To make some realistic human motion.
Video Compressor
Hey everyone, just a tip.......
If you haven't already rendered your scenes (Bit late if you haven't) Marc mentioned to me that using a different compressor is very good for dramatically improving the quality of the renders. I found that changing the compressor to 'Indeo 5.10' made a huge difference, and strangely the file that it produced was smaller in size than the one that the standard compressor produced!
In case anyone doesn't know how to do it, Here's how...
Select 'Rendering' and then 'Render' (Or simply press f10)
Then scroll down to the save file option, Click on the grey box that sais 'files'
Now you will choose the name of the rendered file (I'm sure everyone knows how to do this part anyway)
When you chose the type of file, you want to save, choose .AVI
At the top of this dialogue box there is a drop down menu of different types of file compressor. From here select 'Indeo 5.10' If you have it. Let me know what you think, or if you come across an even better one let me know!
Finished render 2
I also really like the look of Brenda's skin. Because the shading, she looks hot and sweaty!. Nice!
I worked hard to make sure there was lots of movement in each scene. I concentrated on getting the facial expressions right and I feel that they are realistic. I considered Brenda's weight in the scenes that she is in, from doing so I made her head and body move as if she is breathing heavily.
I worked hard to make sure there was lots of movement in each scene. I concentrated on getting the facial expressions right and I feel that they are realistic. I considered Brenda's weight in the scenes that she is in, from doing so I made her head and body move as if she is breathing heavily.
Finished Render 1
Here are a couple of finished renders of Brenda. I am really happy with the lighting. As she is standing inside the burger van the Shadow of the roof of the van covers part of her face. I like the fact that this adds to her angry and miserable persona.
Sunday, 4 May 2008
Rock on!

For the animation there will be a scene where the rocker gets a bit carried away with his air guitar! Enjoy!
Because the eyes that I had been using were very dull and didn't have much life in them, I created some new ones using a method which was new to me. I took the sphere which I already had for the eye and applied a simple eye material to it. This was nothing new, I was exactly the same as what I had done on the face that I made last semester. The problem was that the eyes had no glint in them. To correct this I selected the front polygons of the sphere (the ones which covered the colored part of the eye) then by holding 'shift' I copied the polygons to a new element. This element formed the lens of the eye. Then I flattened the polygons that were originally selected so that the lens would be sit proud of the rest of the eye.
The glint in the eye was then added by applying an HDRI map to the reflect map of the material which I used for the lens of the eye. The video clip shows that the eyes glisten quite nicely and look far more alive.
The latest...

Hey everyone, I haven't posted in a little while so here is an update of what has been going on. I have spent a bit of time updating the rocker and making him look a more 'punky' This was done because it was mentioned to me that he didn't really look very rock 'n' roll!
Main changes are of course the hair, and also the teeth aren't quite so perfect now and I have given him some earrings to finish the look.
Friday, 11 April 2008
The environment

I want to keep the environment simple as the marks a for the characters. So I am going to go for a completely white environment and just have 'Brenda's Baps' (The Burger van) I wanted to make it look as grimy and dank as possible. (Somewhere you really wouldn't want to buy a burger) I'm thinking of adding more mess like ketchup on the counter and scuff marks at the bottom of the van.
Bonning the characters

I found this task to be very tricky and rather tedious. The act of putting the bones in and skinning them isn't much of a problem. But setting the envelopes is very difficult. I spent hours trying to get natural looking creases on the joints of the limbs. As you can see from the video, the Rocker's limbs are now moving about quite nicely. I used the IK Limb Solver to make animating the arms and legs easier.
Character Bodies


 Here are the characters bodies.
OLD ROCKER
I wanted the try and use the body that I already made for the rockers body because the build is reasonably similar. I also thought that this would be a good way to save time. IT WASN'T
It turned out to be an absolute nightmare to try to add clothing to a body that I had already made. So I started from scratch and this worked out far better and the finnished result had far less polygons, which is always good for render times.
BURGER LADY
Because Brenda will be behind a counter, it made sense to not model her legs. This will save a lot of time when it comes to bonning her as this is a lengthy procces anyway.
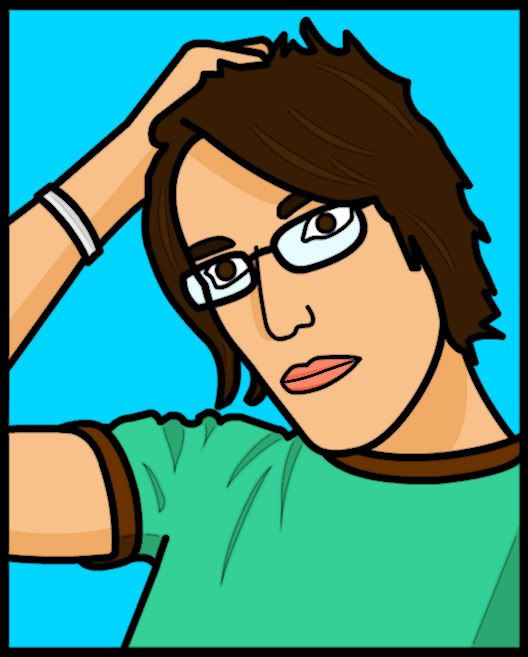
The two heads
 Here are the two Characters heads. I really like the the contrast between the characters. I think this will be affective in the final sequence when it comes to making a personality for each one.

Wednesday, 5 March 2008
Morpher
I have been having A LOT of fun with the morpher modifyer today. I have used it to make several expressions for my character. I was surprised at how simple it was to achieve realistic facial expressions.
A tip for anyone who has used the Symmetry mod, When you clone the mesh for the morpher, make sure that you convert the whole clone to an editable poly, because I found that when the Symmetry mod was used on the target for the morpher, it made a huge mess of the mirrored side of the face.
A tip for anyone who has used the Symmetry mod, When you clone the mesh for the morpher, make sure that you convert the whole clone to an editable poly, because I found that when the Symmetry mod was used on the target for the morpher, it made a huge mess of the mirrored side of the face.
Teeth/inside of mouth

For lip sync, The mouth will need some inside detail. When pronounce the letter S for example we show our teeth and for TH our tongue comes between our teeth slightly
In the image I have just used a simple multi-sub material to show the teeth as a different colour to the skin, When it is done I will use a photo of real teeth and map it on to the model.


The Mesh In More Detail....


 As you can see when comparing it with the original sketch, the character has a long face and a pointy chin. The bags under his eyes demonstrate that a life of Rock and Roll has taken it toll on his face/skin. The map will further enhance this when it is applied.
 Hey every one, Yesterday I had a bit of a 3D Studio Max binge.....
 Wednesday, 20 February 2008
A few improvements...

 I have been tweeking the model since last week, It was mentioned that before, there was no definition of shoulders in the arms. It sort of just went straight into a bicep. So I corrected this by adding a new edge and raising it so that when the smooth was re-applied, the shoulders were formed.
Also from the profile, you can see the chest is slightly smaller, to make it more of an average mans body shape.
First attempt at Bonning

 Ok so... the above image shows the person all rigged up. For the arms and legs I used the IKLimb solver and for the spine I used the standard IKHISolver. This was because the spine requires more than 3 bones.
 The bottom image shows the arms in the down position after the skin modifyer was applied to the mesh. Getting the envelopes right was an absolute nightmare. I think I am going to need a lot of practice with this technique before I can become compitent with rigging up characters!
In spite of this I am quite happy with the way that the skin creases.
It is to early to bone the characters now as the clothing hasn't been moddled. I have done it just to get some practice in so that I have a better knowledge of the process.
Aged Rocker
Name
Barry, Clive, Steve, Phil, John
Age
50's
He looks like he is stuck in the 70's / 80's. Is very much into the old Rock and Roll music (The time when men were men and cars were metal)
His thumbs are always in his pockets assif they are glued there
He talks like he is intoxicated and has a very 'floaty' walk. Like a ghost.
He wears a leather jacket covering a rolling stones T-shirt. He wears black jeans that are ripped at the knee.
Burger Van Lady
Name
Cath, Tracey, Helgar, Rosane, Denise, Or Burger Van-Lady
Age
Late 30's / Early 40's
She is a quite 'In your face' person. She is very brash and could come over as being quite offensive
She lives in Bethnal Green with her dog (a scrufffy, dirty dog)
She drives her Burger van which is a dirty and quite dated
She wears a greasy white t-shirt bearly covered by a striped apron which moulds round her 'fuller' figure


Friday, 15 February 2008


My first man....... but not my last i'm going to bone him later
 The model started life as the box that you can see at the top of the image. You can just about make out that it has 3 length segs and 2 height segs. I then deleted polygons where the arms legs and head would be. By extruding edges I created one arm and one leg and also the head. Then in the top viewport I sliced a line straight down the centre of the head. After deleting any polygons on the limbless side of the head, I used the symmetry modifyer to mirror the arms and legs to the other side. Then I applied a mesh smooth to do exactly what it suggests! and I also used a turbo smooth which just gets rid of any rough areas and makes it look more like skin.
Wednesday, 6 February 2008


Subscribe to:
Posts (Atom)